| Purpose | ||||||||||||||||||||||||
| This
training module covers the "Fine Tune" methodology, which is required
to ensure that the frequency of the captured peaks is accurate. If this is
not the case, then when Vasona
attempts a quasi peak or average measurement, it may not give you accurate
results. Spectrum analysers do not provide accurate frequency measurements when data is captured in large spans. We need to make these types of measurements to speed up the process, hence you must fine tune the frequencies prior to formal testing. |
||||||||||||||||||||||||
| Information | ||||||||||||||||||||||||
| Step | Function | Form | Description | |||||||||||||||||||||
| 1. | Select Frequency | Results | From
the debug table highlight the first [or relevant frequency]. This is
achieved by placing the mouse over the frequency and then 'right mouse button'
clicking.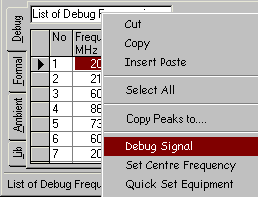
In this selection, we have chosen the first
signal on the list, to complete the process ALL signals must be fined tuned. |
|||||||||||||||||||||
| 2. | Select Frequency | Results | The
objective is to update the frequency of the emission in the list. If you
have a small analyser span, say 2MHz, this will ensure this accuracy. You need to use various functions of the spectrum analyser facilitate this, the typical ones required are given in the control panel, under the debug TAB. 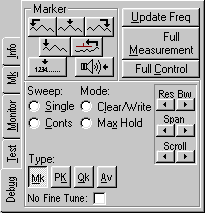
Clicking on the "update freq
button" reads the current analyser marker frequency and updates the current
list.
|
|||||||||||||||||||||
| Results | Typical
operations, begin from the first and work through them. First Set the polarity of the antenna to that shown in the list.
|
|||||||||||||||||||||||
| 3. | Next Frequency | Results | Select
next emission in the list, this can be achieved by moving the mouse over the
desired frequency, 'right' mouse button clicking and selecting 'set centre
frequency'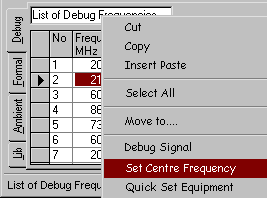
This will just set the centre frequency of the
analyser to that in the list, namely 216.119MHz. If the configuration set
of the analyser is significantly different between frequencies, then you are
advised to select "Debug Signal". |
|||||||||||||||||||||
| 4. | Process | Results | Repeat this process of fine tuning until all frequencies have been updated. | |||||||||||||||||||||
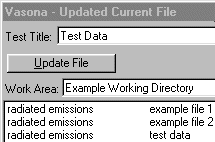
| 5. | Store Data | Results + Save Results Window |
To re-store the current debug data:-
|
|||||||||||||||||||||
| The other details.... |
| HDR.Expert, EMiSoft © 1997-2019 [Trademarks mentioned herein are the property of their respective owners.] |